Tatting
Shuttle tatting is the hand lace technique of tying double stitch knots onto a foundation thread that is shaped into rings and chains to form a lacy material. The double stitch knot is the same type of knot as the lark's head knot used in macrame.
In shuttle tatting, the right hand is used to maneuver the shuttle around the thread that is held on the left hand. The left hand is used to maneuver the thread that forms the stitches.
The trick to tatting is to perform the movements made by the right and left hands in a continuous motion as you form the loops and tie the knots. This takes a little patience and practice. Once the basic steps are mastered, it is very easy.
Working Posture
- Wind three yards of thread onto the shuttle, leaving a 24" end.
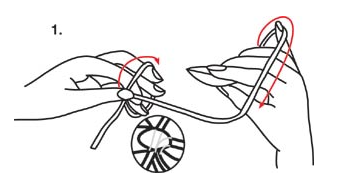
- Hold the shuttle with your thumb and index finger on your right hand and hold the thread about 3" from the end between your thumb and index finger on your left hand. Wrap the thread clockwise in a circle around the fingers on your left hand and back through your thumb and index finger.
This loop is called the working thread and it forms the stitches. The thread that stretches between the loop on your left hand and the shuttle is called the shuttle thread, and it is the foundation that the stitches are worked onto.
Now you are ready to make stitches.
Double Stitch (abbreviated ds)
This clip is from the Annie's video class Learn to Shuttle Tat with instructor Janette Baker.
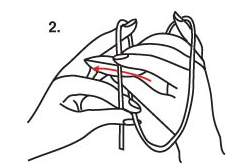
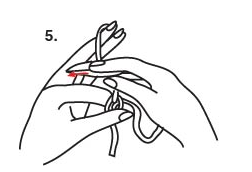
1: For the first half of the stitch, pass the shuttle to the left under the working thread, between the index and middle fingers, up over the top of the working thread and back to the right through the shuttle thread loop.
2: At the same time, relaxing the last three fingers on the left hand just enough to loosen the tension on the working thread (do not allow the loop to come completely off these fingers), pull the shuttle thread taut so a loop from the working thread forms around the shuttle thread.
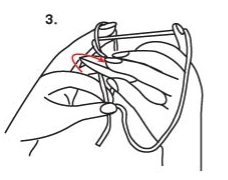
3: Spread the last three fingers out again and slightly twist the left wrist, tightening the tension on the working thread and the loop on the shuttle thread. Sometimes this is called the “flip” or “snap”; it is also the hardest part of tatting.
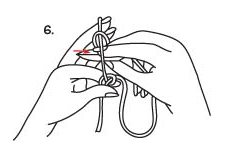
4: For the second half of the stitch, pass the shuttle to the left over the top of the working thread, down between the index and middle fingers, back to the right under the working thread and through the shuttle thread loop.
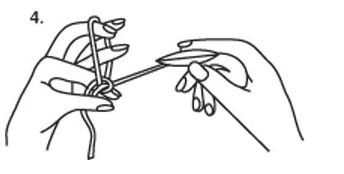
5: At the same time, relaxing the last three fingers on your left hand, pull the shuttle thread taut so another loop from the working thread forms around the shuttle thread.
6: Then spread the last 3 fingers out again and twist the left wrist, tightening the tension on the working thread and the loop on the shuttle thread.
7: If the stitch is properly formed, it will slide along the shuttle thread. If it doesn’t, cut the knot and begin again. As the stitches are made, the working thread loop must stay large enough for the shuttle to pass through. Slide the shuttle thread back through the stitches to increase the size of the loop.
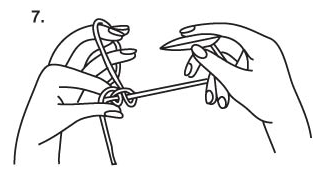
8: Hold the completed stitch between the thumb and index finger while working the next stitch.
Picot (abbreviated p)
This clip is from the Annie's video class Learn to Shuttle Tat with instructor Janette Baker.
For a picot, leave a space between two double stitches; when the stitches are pulled together, the space forms a loop.