Finishing Pillow Edges With Fabric-Covered Cord or Trim
Inserting homemade, fabric-covered cord around the edges of a pillow gives it a tailored look for a more formal setting. The same process can be used with purchased home decor trims, which may provide elegance or whimsy. To make fabric-covered cord:
1.Cut bias or straight-grain fabric strips approximately three times the circumference of the cord width and at least 4" longer than the length needed, or as indicated in the pattern. Note: While you may find bias strips a little harder to work with, they will fold over the cord much tighter and give a more finished look. For example, if using 1/2" cord on the outside edges of a 14" square pillow, you will need a strip 1 1/2" wide and 60" long.
2. Beginning approximately 2" from the strip end, fold the strip around the cord wrong sides together, matching the strip edges. Pin close to the cord for 3" to hold when beginning to stitch.
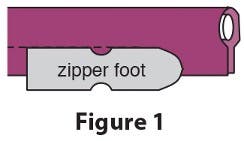
3. Keeping the cord inside the folded strip and strip edges matching for entire length, use a zipper foot (or cording foot) to slowly stitch close to the cord as shown in Figure 1. When complete, the fabric strip should extend slightly beyond the ends of the cord.
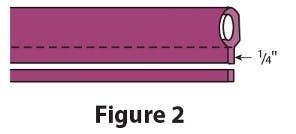
4. If necessary, trim the covered-cord seam allowance to the same seam allowance being used to stitch the pillow edges together as shown in Figure 2. Quilting patterns use a 1/4" seam allowance, and sewing patterns use a 1/2" seam allowance.
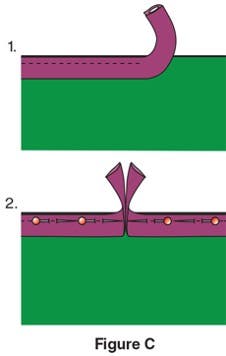
5. Position and pin one end of the covered cord at the center of one side of the pillow. Pull the empty fabric strip ends toward the pillow edges as shown in Figure 3a. Continue pinning the covered cord to the pillow-top edges.
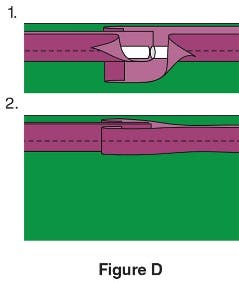
6. To reduce bulk where the cord ends meet, pin one covered cord end to meet the other end, again pulling the empty fabric strip ends toward the pillow edges, referring to Figure 4a. Another option is to overlap the strip and have the cord meet in the interior of the folded strip as shown in Figure 4b.
7. Optional: Baste the covered cord to the pillow top, matching covered cord and pillow raw edges.
8. Layer the pillow top and back as instructed in the pattern and pin the edges close to the cord. Stitch as close as possible to the cord using a zipper or cording foot.
9. You can add purchased home decor trims to the pillow edges in the same manner, matching the seam allowances of the trim and pillow.