Cables
Cables are a knitting technique where you change the order of your stitches by bringing stitches in front of or behind your work to cross them. Cables can be worked over any number of stitches. They can also be worked in a stitch pattern or combination of patterns. You can have garter stitch cables, ribbed cables, stockinette stitch cables, half seed stitch cables and more. The possibilities are endless. There is also a wide variety of ways to cross the stitches and combine them to make unique cables.
To create cables, you will typically use a cable needle. These come in many shapes and sizes. They are used to help move the stitches out of the way and aid in working them out of order. Stitches are slid onto the cable needle and held out of the way, in front of or behind the knitting, until it is time to work them. Anything small that fits within the loops of the stitches can be used in place of a cable needle, like a pencil or toothpick. You can work cables without a cable needle if you so choose. It is quicker but can be a bit trickier to master.
There are a lot of abbreviations used in cable knitting. Pay attention to the pattern instructions to determine what the abbreviations mean and how to work the stitches. Generally, they involve a number -- the number of stitches involved in the cable -- as well as the direction the cable will lean or cross (right or left). The exact abbreviation is up to the designer. Designers will usually give an explanation in their pattern instructions. Charts are also used often in cable patterns because they make tracking the stitching easier and provide the stitcher with a good visual reference.
Cabled fabric tends to be thicker because of the crossing of fabric; therefore, it is ideal for winter garments and accessories.
Since there are so many options for how to work cables, the below are just a couple of general examples to help you understand the concept. The video shows a different number of stitches being worked than what the illustrations show.
The numbers in the name of this cable indicate how many stitches the cable is worked over. 2/3 is a cable using five stitches. Two stitches will be crossed behind three stitches. The words “right cross” tell us the cable will cross the stitches and lean to the right.
2/3 Right Cross (abbreviated 2/3 RC)
Slip two stitches onto a cable needle and hold the stitches at the back of the work. Knit the next three stitches on the left-hand knitting needle, and then knit the stitches from the cable needle. You can knit them directly from the cable needle or you can transfer the stitches from the cable needle to the left-hand needle to knit them. Use the method that you prefer.
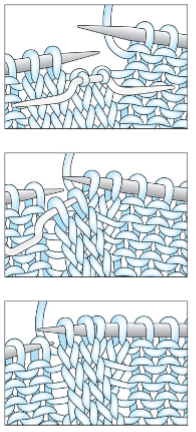
2/2 Left Cross (abbreviated 2/2 LC)
The cable below matches the illustrations. This cable uses four stitches with two of them being crossed in front of the other two stitches. This produces a left-leaning cable once complete.
Slip two stitches onto a cable needle and hold the stitches in front of the work. Knit the next two stitches on the left-hand knitting needle, then knit the stitches from the cable needle. You can knit them directly from the cable needle or you can transfer the stitches from the cable needle to the left-hand needle to knit them. Use the method that you prefer.