How to Knit in the Round
We can work knitting flat (back and forth in rows) or we can work it in the round (in a tube). This is sometimes called circular knitting as you are working in a spiral. Working in a spiral knitting creates a seamless tube. It is great for working accessories like hats, mittens and socks. It is also nice for working garments when you want to avoid a lot of sewing (i.e. seams).
You can work almost any stitch pattern in the round. You just have to realize that your stitches present themselves a bit differently when worked in the round. If you knit every stitch of every round, then you will get a stockinette stitch fabric. To get a garter stitch fabric in the round, you will need to knit one round and purl the next round. Since you are essentially working a spiral when working in the round, some stitch patterns will have a bit of a jog where the last stitch meets the first stitch of the next round. This is normal. You can also still shape your knitting with increases and decreases.
However, you are going to need some different materials for knitting in the round. Stitch markers are helpful for marking the beginning of your rounds. There are a few methods for working in the round that involve using different types of knitting needles. Most patterns are written in a way that you can use your favorite method to create the project. If a pattern calls for a specific method of knitting in the round, you may still be able to use your preferred method, but it’s probably going to require a bit of thought to convert the pattern. Below are some different ways to knit in the round. They each use a particular needle type.
Double-Pointed Needles (abbreviated dpn{s})
Double-pointed needles are knitting needles with a tapered tip on both ends. You can use either tapered end to knit with. They come in many different lengths, though they are normally shorter than straight needles. They are sold in sets of three to five needles because you will need to be able to divide your stitches up over several needles to create a tube of fabric. You will use one needle to knit with while the rest hold the loops of your stitches.
You can cast your stitches on using your preferred method. Try to cast them all onto one needle and then divide them over your other needles. If using a set of four double-pointed needles, you would divide the stitches over three of the needles as evenly as possible and then use the fourth to knit with. This way of knitting in the round can feel very clumsy and hard to handle at first. It takes some practice and focus to get into a rhythm working with all the needles.
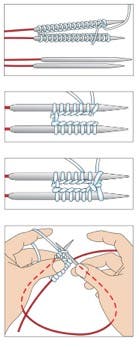
This video uses the long-tail method to cast on the required number of stitches and uses a set of four double-pointed needles.
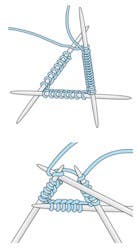
Evenly divide the stitches between the knitting needles and then arrange the knitting needles to form a triangle, with the base down and the point facing up. The stitches are at the outeredge of the triangle formed by the needles and should not be twisted. Both the tail end and the end of yarn connected to the skein are at the end of needle three.
From here you will work across the first needle until you have worked all of its stitches onto the fourth needle. This first needle is now free of stitches and will become the needle you knit with. Center the stitches that you just worked onto the needle they are now on so that they remain securely in place away from the tips. Move on to the stitches of the next needle and knit across them. You have now moved all of them onto your working needle and freed up the next needle. Again, center the stitches you just worked on the needle and then knit across your last needle. You have now completed one round of knitting.
Continue knitting in the round in this way following your pattern’s instructions.
You will want to mark the beginning of your round. With double-pointed needles, you always have a space between your needles so a stitch marker can’t be placed there. Try adjusting the stitches on your needles so that the first stitch of the round is actually in the middle of one of the double-pointed needles. Then place a stitch marker between the first and last stitch of the round to keep your place.
Circular Needle
Another way to work in the round is to use a circular needle. This needle is made of two needle tips connected by a cord or cable. Circular needles come in many cable lengths. You want to use the length that allows you to work around without pulling the stitches. The finished circumference of the piece that you are going to make will help you decide what length to choose. Choose a length smaller than what you will be creating so the stitches move smoothly around. If you choose a length that is longer than the circumference you will be working, it will tug and pull at the stitches and you will have a hard time working in the round.
There are fixed and interchangeable needles available. With fixed circular needles, the tips and cable are permanently attached to each other. With interchangeable circular needles, you can remove the needle tips from the cable. You can purchase interchangeable needles in sets containing several tip sizes.
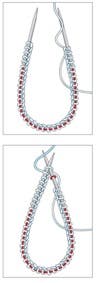
Cast on the required number of stitches as you would onto a straight knitting needle. Spread the stitches evenly across the circular knitting needle, being careful not to twist the stitches. Hold the circular knitting needle so that the working end of the yarn is on the right-hand tip. Place a stitch marker on the right-hand knitting needle tip to mark the beginning of the round. Knit the first stitch on the left-hand knitting needle tip. Keep knitting the stitches, sliding them along the circular knitting needle as you work them from left to right. When you reach the stitch marker, slip it to the right-hand knitting needle tip and continue knitting around for the required number of rounds stated in your pattern.
Magic Loop
Magic loop is a way of working in the round using a very long circular knitting needle. This method is usually used for smaller circumference knitting like socks, sleeves, hats, mittens, etc.
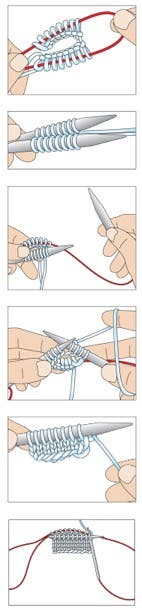
Cast on the required number of stitches onto a 34-inch, or longer, circular knitting needle. Slide the stitches to the cable portion of the circular knitting needle. Pinch the cable in half and then pull to create a large loop, dividing your stitches in half, then arranging half of the stitches on one knitting needle tip and half on the other tip. You will have a needle tip in front with stitches and a needle tip in back with stitches. The needle in back should contain the last stitch made with the working yarn.
Hold the knitting needle in your left hand, and pull out the knitting needle tip that holds the working yarn so that the stitches that were on the needle tip are now resting on the cable. Using this needle tip, work the stitches that are still on the front knitting needle tip as if you were working on straight knitting needles. At the end of the stitches on this half, simply turn the work around and reposition the stitches so that half of the stitches to be worked are on the knitting needle tip and the other half are resting on the knitting needle cable. Continue to work in this manner following pattern instructions for specifics.
Two Circular Needles
You can also work in the round using two circular needles. This method is usually used for smaller circumference knitting like socks, sleeves, hats, mittens, etc.
It can be a bit tricky to master this method. You may find it easier to use two circular needles that look different from one another when learning this method. Your circular needles should be between 16 and 24 inches in length, as using longer ones may be a hindrance.
Cast on the required number of stitches, dividing the stitches between two circular knitting needles.
Slip the last cast-on stitch from the bottom knitting needle to the top knitting needle. Slip the first cast-on stitch from the top knitting needle over the transferred stitch and onto the bottom knitting needle. This creates a smoother transition. If it seems too confusing or cumbersome, you can skip this step and move on to knitting.
Adjust the stitches so that the nonworking stitches are on the cable of the bottom knitting needle and the working stitches are on the top knitting needle. Work all stitches across the top knitting needle. Turn your work so that the top knitting needle is now on the bottom and the newly worked stitches are resting on the cable, and the bottom knitting needle is on the top holding the stitches that are to be worked. Continue in this way as your pattern directs.