How to Decrease
Decreasing stitches allows knitters to add shape to their projects or decorative touches, depending on how the decreases are used and if they are used in conjunction with increases. Taking away stitches can narrow knit fabric to a specific size. When decreases are used with increases, they can also create decorative stitches like lacework. Being able to make decreases is necessary for most garment-making, and for many accessories as well.
There are many ways to create decreases. Which you use depends on the look that you are going for, whether you’re working the decrease as a knit or purl stitch and if you want the decrease to slant a certain direction. Most decreases take two stitches down to one stitch, but they can also be worked over more than two stitches at a time if needed. Decreases can slant to the left or right to blend in with the knitted fabric or to lend a decorative touch. A few of types of decreases are explained below.
Generally speaking, a knitting pattern will specify which type of decrease to use. If it doesn’t, you are free to use your preferred method or the one you feel will look the best in the knitted fabric. Try experimenting with different techniques in a practice swatch to see how different methods look and feel.
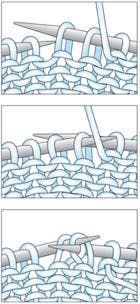
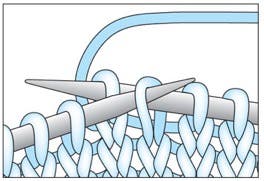
Knit 2 Together (abbreviated k2tog)
This is the most common decrease. It is neat and easy to do. You simply knit into two loops (or stitches) at the same time instead of one. This decrease is generally used on fabric that predominantly contains knit stitches. This stitch will slant to the right side.
You can knit more than two stitches together at a time. If that is needed, your instructions will tell you how many to work into by showing the abbreviation with a larger number. For example, if knitting three stitches together to make one, it would read: k3tog.
Insert the tip of the right-hand knitting needle through the next two stitches on the left-hand knitting needle as if to knit. Knit these two stitches together as one.
Purl 2 Together (abbreviated p2tog)
This is the most common decrease for a predominantly purl stitch fabric. It will create a stitch that slants to the right on the knit side of the fabric and to the left on the purl side, though on the purl side it will just appear as a purl bump and the slant isn’t extremely noticeable. To make this decrease, purl into two loops (stitches) at the same time instead of one.
You can purl more than two stitches together at a time. If that is needed, your instructions will tell you how many to work into by showing the abbreviation with a larger number. For example, if purling three stitches together to make one, it would read: p3tog.
Insert the tip of the right-hand knitting needle through the next two stitches on the left-hand knitting needle as if to purl. Purl these two stitches together as one.
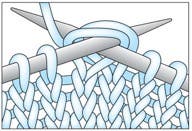
Slip, Slip, Knit (abbreviated ssk)
This decrease will lean to the left. This left lean is achieved by slipping stitches in a specific way to the right-hand needle before working into them. As with knitting 2 stitches together, you can work this left-leaning increase over more than two stitches. For example, if working over three stitches, you may see it written: sssk.
Slip the next stitch knitwise with the yarn in back from the left-hand knitting needle to the right-hand knitting needle, then slip the next stitch knitwise with the yarn in back from the left-hand knitting needle to the right-hand knitting needle. Insert the tip of the left-hand knitting needle knitwise (in front of the right-hand knitting needle) through both slipped stitches and knit these two stitches together.
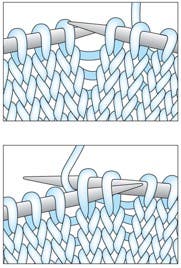
Slip, Slip, Purl (abbreviated ssp)
This decrease is used when the fabric is predominantly purl stitches. This stitch leans slightly right on the purl side and left on the knit side of the fabric.
Slip the next stitch purlwise with the yarn in front from the left-hand knitting needle to the right-hand knitting needle, then slip the next stitch purlwise with the yarn in front from the left-hand knitting needle to the right-hand knitting needle. Transfer the two stitches back to the left-hand knitting needle. Insert the tip of the right-hand knitting needle into the back legs of the two stitches going into the far left one first. Then purl the two stitches together.
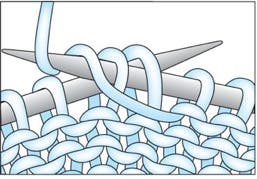
Slip 1, Knit 1, Pass Slipped Stitch Over (abbreviated skp)
While the result can look very similar to the slip, slip, knit (ssk) decrease with its slant to the left side, this technique does not twist the bottom of the stitches. Some knitters prefer this method, especially when using larger yarn, because you are only working with one stitch at a time.
Slip the next stitch knitwise to the right-hand knitting needle. Knit the next stitch on the left-hand knitting needle. Insert the left-hand knitting needle into the slipped stitch and pull it over the first stitch and off the knitting needle.
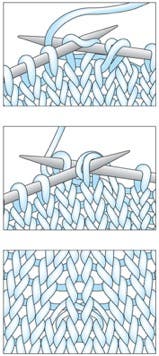
Center Double Decrease (abbreviated CDD or sk2p2)
This decrease takes three stitches down to one stitch. In other words, it decreases two stitches. It is worked in such a way that the two stitches that are decreased away are tucked behind the center stitch so that there isn’t a slant to this stitch.
Slip the next two stitches knitwise as if to knit the next two together from the left-hand knitting needle to the right-hand knitting needle. Knit the next stitch on the left-hand knitting needle. Insert the left-hand knitting needle into the two slipped stitches and pull them over the first stitch and off the right-hand knitting needle as one.