Create this adorable beginner crochet cat pattern using all squares and rectangles. Simple crochet stitching, a dash of creativity and a fair bit of basic sewing come together in this cute free crochet pattern.
Skill Level
Beginner
Finished Measurements
Approximately 2½–2¾ inches square, excluding features
Note: These are the measurements your piece should be close to once completed.
Gauge
Gauge is not critical for this project.
Note: Gauge is the number of stitches (sts) the designer worked over a specific measurement.
Materials
- At least 90 yds each of worsted-weight acrylic yarn in 2 colors Tip: Look for the #4 icon on the label. #4 is used to label worsted-weight yarns.
- Small amount black worsted-weight yarn for face embroidery
- Size 4mm crochet hook (which can also be listed as G or 6)
- Removable stitch markers: 2 (optional)
- Straight pins (optional)
- Tapestry needle for weaving in ends and sewing pieces
- Fiberfill
What You Will Learn
In this pattern, you will learn how to: hold your hook and yarn, make a slip knot, chain, single crochet, use stitch markers, fasten off, weave in ends, work embroidery, whipstitch, and sew pieces together.
Right-handed video instructions
Left-handed video instructions
Pattern Notes
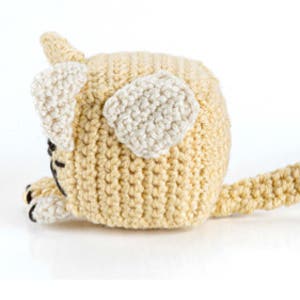
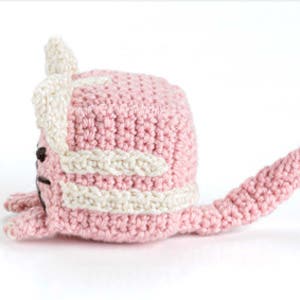
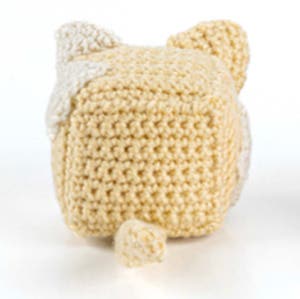
This cat may look complex, but it’s made up of a series of squares and rectangles that are sewn together to create the finished piece. You will make squares and rectangles, then whipstitch them in place, first to create a cube body and then to create the features. Straight pins can be used to help keep features in place while sewing them to the cube body. To avoid lumpiness, use small amounts of fiberfill at a time as you stuff the cat. Stuff until firm, but do not overstuff as you won’t want to pull the stitching apart enough to see the stuffing. This cat is stitched with a hook smaller than the recommended hook on the yarn label. This is intentional to keep the stitches tight. You want tight stitches to help prevent stuffing from showing and to give the cat more structure. For best results, use the hook size listed in the Materials. One 1.76oz skein will not make all parts of the cat. You will need a 2nd skein if you want a solid-colored cat.
Cat Cube Body
Square. Make 6.
Tip: This means you will repeat (rep) the instructions below a total of 6 times to create all the squares for the body of the cat. This yarn tail will be woven in later.
Row 1
Step 1
With main color (MC) of your choice, make a slip knot with about a 4-inch tail. Place slip knot on hook.


Step 2
Chain (ch) 11.


Step 3
Turn to work back across chains (chs).
Single crochet (sc) in 2nd chain (ch) from hook.


Step 4
Place stitch marker in the top of this stitch.
Tip: This is optional but will help you easily see where your first (st) is for working the next rows, especially if you set your work down and walk away for a while.

Step 5
Single crochet (sc) in each chain (ch) across.


Step 6
Place stitch marker in last stitch (st).
Tip: This is optional but will help you easily see where your last stitch (st) is, especially if you set your work down and walk away for a while.

Row 2
Step 7
(10 single crochet {sc})
Tip: The number of stitches you see in parentheses is the stitch (st) count. It means you should have 10 single crochet (sc). Stitch (st) counts help you stay on track throughout a pattern.
Chain (ch) 1 to build up height of your row.

Step 8
Move stitch marker to this first stitch (st)
Single crochet (sc) in next and each stitch (st) across.
Tip: Again, this is optional but is a good indicator for where to place your last stitch (st)


Place stitch marker in last stitch (st).
Turn work counterclockwise.
(10 single crochet {sc})
Repeat (rep) row 2 until piece is square (about 2½–2¾ inches wide and tall) or approximately 11 to 12 rows tall.
Fasten off, leaving an approximately 28-inch tail for sewing.
Weave in starting tail.
Tip: You may want to periodically stop working and check to make sure your edges are remaining straight. If the edges seem like they are pinching inward (getting more narrow), you may want to undo a row or two and work with a hook one size larger. Your tension may be tightening up. Using a larger hook in the later rows will help to keep things even.
Fasten off means cut the yarn, leaving about a 28-inch tail, then pull through the stitch (st). Leaving a very long tail will save you from having more ends to weave in because you can use the tail to sew your pieces together (tog).
To weave in yarn tail, thread it onto tapestry needle. Run needle under legs (or the V’s of the body) of several stitches (sts), keeping needle on the wrong side (WS) of work. Pull strand through, being careful not to pull tightly. Rotate piece and run needle back in other direction, skipping (sk) first leg of first stitch (st) and running through legs of same stitches (sts). Cut yarn near fabric.


Body Assembly
Step 9
Once all squares for Cube Body have been made, whipstitch them together (tog) to create cube for body following instructions below.

Step 10
Take 2 squares and match them along 1 side with long tail of 1 square in top right corner (left corner for left-handed stitchers) for sewing. Whipstitch through edges of both squares at same time, working whipstitches evenly across side. Whipstitches will be on outside of body. Run your yarn tail under several stitches (sts) on inside of body to secure yarn tail. You do not need to trim yarn tail, but you can if you would like.


Step 11
Take your next square and align it along side of 1 of 2 squares you just sewed together (tog), again with yarn tail in place to use it to whipstitch pieces together (tog). Continue with 1 more square so that you have 4 squares joined along sides.

Step 12
Whipstitch remaining (rem) side of 4th square to open side of first square to create box shape.


Step 13
Take another square and place it on top of box. Whipstitch this square in place around all sides. Rotate cube to attach final square to bottom. Whipstitch around 3 sides, but don’t secure the yarn tail yet. Stuff with fiberfill until firm but not bulging. Fiberfill will squish down over time so be sure you have the cube firmly filled. Once stuffed, whipstitch final side closed. Set aside.


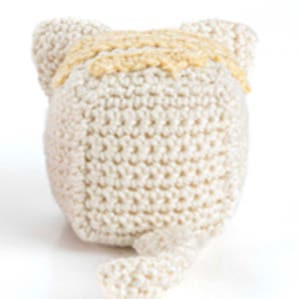
Ears
Step 14
Make 2.
Tip: This means you will repeat (rep) the instructions below a total of 2 times. to create the squares for the ears of the cat. Here is where you can get a bit creative with your cat. You can choose to make the Ears the same color as the body or a contrasting color to make the cat uniquely yours.
Ear Assembly
Step 15
Fold 2 opposite corners together (tog) to create a small triangle. It will be helpful to have your sewing tail in position at right (left for left-handed stitchers) side edge for sewing in place.
Center triangle on top corner of 1 side of your Cube Body. You can use straight pins to hold triangle in place while you sew. With your tapestry needle and yarn tail, go down into fabric of Cube Body and then up into Ear triangle along fold. Sew in place using a running stitch. When you reach center of Ear, you will be at tip of corner
of Cube Body. Continue using a running stitch to attach rest of Ear triangle to top of Cube Body. Next whipstitch 2 side edges of your Ear triangle together (tog) to complete Ear.
Repeat (rep) with other Ear on opposite side of Cube Body.


Tail
Step 16
Tip: Again you can get creative here and use whatever color you would like for the Tail.
Tail Assembly
Step 17
Run sewing tail through stitches (sts) at end of Tail and pull tight to cinch them together (tog). Fold Tail in half lengthwise. Whipstitch this edge together (tog).

Center Tail on back bottom of Cube Body. You can use straight pins to hold in place. Flatten bottom end of Tail together (tog) and whipstitch end of Tail to bottom edge of Cube Body, being sure to work through all layers.


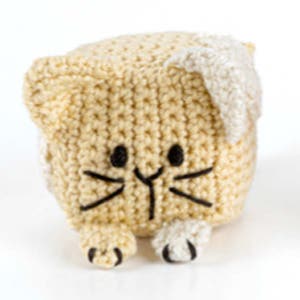
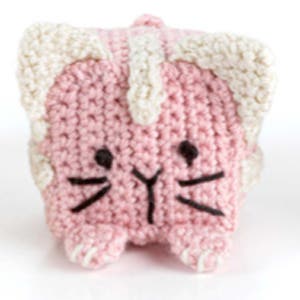
Paws
Step 18
Make 2.
Row 1:
With color of your choice, make a slip knot with about a 4-inch tail. Place slip knot on hook.
Chain (ch) 6.
Turn to work back across chains (chs).
Single crochet (sc) in 2nd chain (ch) from hook. Place stitch marker in top of this stitch (st). Single crochet (sc) in each chain (ch) across. Place stitch marker in last stitch (st).
Turn work counterclockwise.
(5 single crochet {sc})
Row 2:
Chain (ch) 1 to build up height of your row.
Single crochet (sc) in first stitch (st).
Move stitch marker to this first stitch (st).
Single crochet (sc) in next and each stitch (st) across. Place stitch marker in last stitch (st).
Turn work counterclockwise.
(6 single crochet {sc})
Row 3:
Chain (ch) 1 to build up height of your row.
Single crochet (sc) in the first stitch (st).
Single crochet (sc) in next and each stitch (st) across. Turn work counterclockwise.
(6 single crochet {sc})
Fasten off, leaving a 9-inch tail for sewing.
Weave in starting tail.
Paw Assembly
Step 19
Run sewing tail through stitches (sts) at end of Paw and pull tight to cinch them together (tog). Fold Paw in half. Whipstitch edge together (tog).
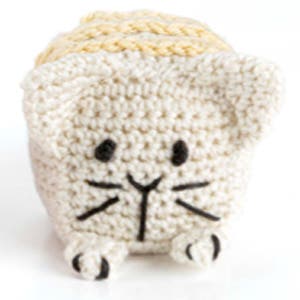
Place Paw along bottom edge of front of Cube Body near side using photo as a guide. You can use straight pins to hold in place. Flatten bottom end of Paw together (tog) and whipstitch end of Paw to bottom edge of Cube Body, being sure to work through all layers.


With color of choice and using photo as a guide, sew 2 straight stitches on end of Paw for claws.
repeat (rep) with other Paw


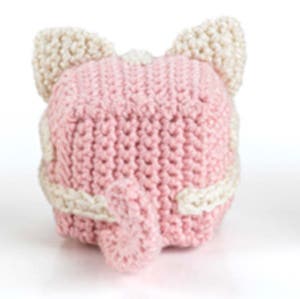
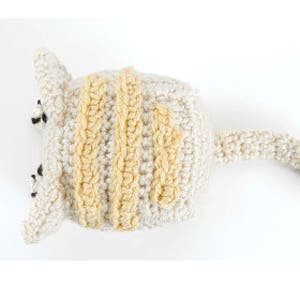
Stripes
Step 20
Tip: The stripes are optional, meaning you don't have to make them. They are another way to add a creative touch to your cat. If you choose to make them, you can also decide how many of each you would like to make and where to place them. The pink version of the cat uses all stripes in the following instructions.
Stripe Assembly
Step 21
Using photo as a guide for placement and using straight pins to hold in place, place your Stripes on Cube Body as you would like them. With sewing tail and using running stitch, sew Stripes in place on Cube Body.
If you would like a bit more variety and creativity, make a few more of the Ear pieces and use them as spots for your cat, sewing them on with running stitches or whipstitch.


Finishing
Step 22
Using photo as guide and black yarn, sew straight stitches in a V shape just below center of square for nose and then straight stitch from point of V toward center bottom of face for mouth. Next use straight stitches to sew 2 whiskers on each side of nose and mouth.


Tip: Again using photo as guide, decide where you would like the eyes to be. You can mark locations with straight pins if you would like. Using black yarn, make a French knot for each eye.
To make a French knot, bring yarn up through base of where you would like to place the eye, bring needle down one stitch above this location and back through the same spot as the base of the eye but do not pull needle all the way through. Wrap the yarn around the needle tip 5 times, pinch and hold the wraps in place as you pull the needle through. This completes the French knot. Go back down through the fabric near the knot to complete and lock in place.