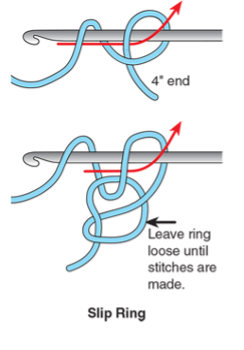
Slip Ring or Magic Ring
The slip ring has many names in crochet: magic ring, magic loop, magic circle, adjustable ring, etc. It is a way of starting your crochet project when you are going to create something in the round. You can place a number of stitches in the ring and then cinch it up to make a nice, clean and easy start to the project. This is an alternative to having a starting chain or working several stitches into the base of a short starting chain.
Slip Ring or Magic Ring (Left-Handed)
Leaving a tail 4 to 5 inches long, start by wrapping the yarn around your index, middle and ring fingers on your hand to form a circle. To do this, take the working yarn up over and around the fingers and then back up in front of them. Let the working yarn cross over itself at the top of your fingers and take it to the back of your fingers.
Next, loosen the circle, grasping the yarn at the top where it crosses and pulling your fingers from the circle. Hold the crossed strands between your thumb and index finger. Take your crochet hook and insert it inside the circle, grab the working yarn with the hook and pull it through the circle and up above the circle. Then hang on to the working yarn and chain a stitch. This holds the slip ring in place and secures it.
Now you are ready to work your stitches into the circle or ring. If your first round is single crochet, you will work all single crochet of the first round in the circle. If your first round tells you that you need a longer turning chain, work more chains and then work your stitches into the ring. As you work your stitches of this first round, work over both the yarn tail and the circle or ring.
Once you have all stitches of round 1 worked, find your yarn tail and pull it until the first stitch of the round meets the last stitch, cinching the circle closed. Then join or continue on as your pattern states for round 2.