How to Form a Slip Knot and Chain Stitch
How to Start a Crochet Project
Once you have figured out how to hold your hook, you are ready to start crocheting. The first steps are to get your first loop on the hook (normally with a slip knot) and then to start making chain stitches. Chain stitches are the base of most crochet patterns. You will see them referred to as the starting chain or the foundation chain because they are the start or foundation of a project.
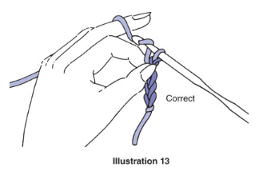
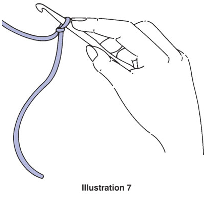
As you work the chains, you’ll need to find a comfortable way to hold and tension your yarn. There isn’t a right or wrong way to do that. It’s just what feels “right” to you. You need to find a way to hold it that allows. Whatever way you choose to do this should allow you to easily grab the yarn while putting a bit of pressure on the yarn at the same time. Most hold the yarn in the opposite hand that they hold the crochet hook. You can try wrapping it around one finger, holding it over the top of one finger and under the other fingers of your hand, or weaving it in and out of several fingers. As you learn to chain, practice holding the yarn in different ways to find what feels comfortable. Don’t hold the yarn too tightly; you only need a bit of pressure. The video will show how the instructor holds the yarn.
There are many ways to create a slip knot. This is one method.
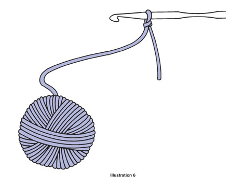
Begin by making a slip knot on the crochet hook about 4 to 6 inches from the free end of the yarn. Start by creating a loop with the yarn. Be sure that the free end of the yarn is dangling behind your loop.
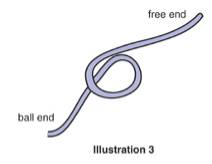
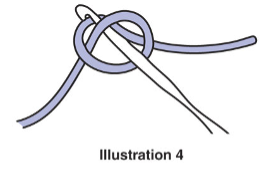
Insert the crochet hook through the center of the loop and hook the free end.
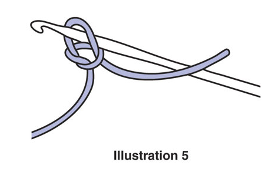
Pull this through and up onto the working area of the crochet hook (see illustration 5).
Pull the free yarn end to tighten the loop. The loop on the crochet hook should be firm, but loose enough to slide back and forth easily on the hook. Be sure you still have about a 4- to 6-inch yarn end.
How to Make a Twist Start
This is an alternative to the slip knot. It’s a simple way to get the first loop on your hook and will leave the starting corner of your crochet smooth.
Leave a long enough tail to weave in later. Hold the yarn tail with your left hand so that the strand is taut from the yarn ball. With your right hand, lay the hook on top of the yarn, move the hook downward and back up under the strand, thus twisting it onto the hook. The yarn will circle around the hook with the two strands (tail and working yarn ends) crossed below it.
Another method you can try is, while holding the yarn taut with your left hand, grab the yarn between two fingers of your right hand and twist clockwise to create a loop, then slide your hook into that loop. The yarn tail and working end of the yarn will be twisted at the base and you are ready to start crocheting. Hold the bottom of the loop until you have created your first stitch.
How to Chain Stitch (abbreviated ch or chs)
Once you have the first loop on your hook, hold the base of the slip knot or twist with the thumb and index finger of your left hand. Make sure the loop on the hook isn’t too tight.
Bring the yarn over the crochet hook from back to front and hook it. This maneuver is called a yarn over (abbreviated yo). You always want to bring the yarn over the hook when creating stitches unless the directions specifically state otherwise.
Draw hooked yarn through the loop on the hook and up onto the working area of the crochet hook by rotating your hook so the hook faces downward. As you pull through the loop, apply a bit of downward tension on the base of the loop on your hook. This will allow the yarn to pass through the loop more easily. You have now made one chain stitch, often written as “chain” without the word “stitch”.
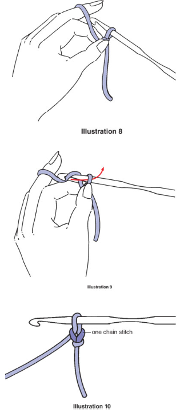
Again, hold the base of the slip knot or twist and bring the yarn over the crochet hook from back to front, performing the yarn over. Hook the yarn and draw through the loop on the hook, rotating your hook as previously described. You have made another chain.
You will repeat the above instructions until you have the number of chains stated in your pattern.

It is important to note that you should always move your left thumb and index finger up the chain so they are close to the crochet hook after each new stitch or two. This helps you control the work. Also, be sure to pull each new stitch up onto the working area, or shaft, of the hook; otherwise, your starting chain stitches will become too tight.