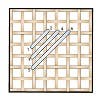
How to Work a Satin Stitch
Satin stitches create a smooth, shiny, and solid area of stitching, achieved by making closely spaced, parallel stitches that cover the fabric completely, giving it a satin-like appearance. It is perfect for filling in small to medium-sized shapes, providing a polished finish. The satin stitch can be worked vertically, horizontally or diagonally and over any number of squares or threads. Follow the chart and written instructions for your design to properly work the stitch for that given project.
![Satin Stitch photo](https://www.anniesattic.com/media/wysiwyg/satin-stitch-1.jpg)
![Satin Stitch diagram (vertical)](https://www.anniesattic.com/media/wysiwyg/satin-stitch-2.jpg)
![Satin Stitch diagram (horizontal)](https://www.anniesattic.com/media/wysiwyg/satin-stitch-3.jpg)
![Satin Stitch diagram (diagonal)](https://www.anniesattic.com/media/wysiwyg/satin-stitch-4.jpg)
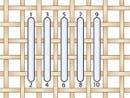
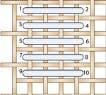
Bring needle up through fabric at (1) and down at (2), then up next to the first stitch at (3) and down at (4). Continue making additional close, parallel stitches in the same manner.