How to Knit & Purl
Introduction
There are two fundamental stitches that make up the basis for knitting. The first is the knit stitch and the second is the purl stitch. The two stitches when worked only or together produce many different types of fabric, such as garter stitch, stockinette stitch and reverse stockinette stitch. Let’s take a closer look at each.
Knitting Methods
We should also discuss the two most common methods of knitting. This refers to how you hold your yarn and needles. In many of the how to videos, you will see the instructor working in the Continental style of knitting. In this style, you hold the needles in both hands and the yarn in your left hand over the forefinger (usually) and you “pick” or pull the yarn through the loops. You may also see the instructor use the English method or “throwing”. In this style, you hold the needles in both hands and you take the yarn and grab it and wrap it over the needle and pull the yarn through the loops. There are of course many other styles or methods but these are the two that you may see used in our knitting videos.
You may find one method easier to do than the other. No matter what method you use to knit the maneuvers are basically the same. Pay attention to how the knitting needle goes into the stitch and how the yarn is placed around the needle and pulled through the loops.
Knitting Needles
There are also many different types of knitting needles made of different materials and in many different thicknesses. Knitting needles can be made of wood, bamboo, resin, plastic, and aluminum. Some yarns flow more smoothly over different materials. For the most part, you can use needles made of the material you find most easy to work with.
The size of the knitting needles refers to the thickness of them. In Europe, the sizes are givn in millimeters (mm) but in the United States the size is a number between 0 and 50 (generally speaking). In the United Kingdom and Canada, they range from 18 to 100. The size to use is dictated by the yarn that you are using or the pattern instructions.
Straight needles: These are two separate long needles varying in length from 8 to 14 inches long with a stopper of some kind on one end. These are used for flat or back and forth knitting. Choose the length that best suits your projects (ie more stitches means you need a longer set of needles).
Double pointed needles: These have a tip on both ends, are shorter in length and usually come in sets of 4-5. These are used for working projects in the round.
Circular needles: These are two knitting needle tips connected by a cable or length of cord. They come in fixed, meaning you can’t remove the tips from the cable/cord, and interchangeable, these you can remove the tips and attach different tips to the cable/cord. The cable or cord can come in varying lengths depending on how many stitches are used in your project and what you are creating. These can be used for working flat or in the round pieces. If working a larger flat piece, circular needles are nice because they can relieve some of the pressure on your hands, wrists and arms when working on a larger project.
How to Knit: (abbreviated k)
The knit stitch is the most basic and fundamental stitch. It’s usually the first stitch everyone learns. If a pattern does not specify how to knit stitches, use this technique.
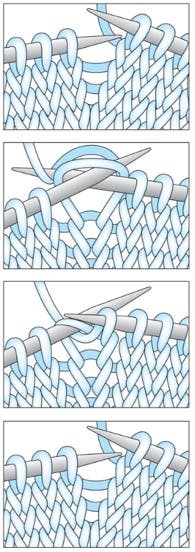
Continental (shown in video): With yarn in back, insert the tip of the right hand (RH) knitting needle from front to back into the front leg of the next stitch (st) on the left hand (LH) knitting needle. Bring the yarn under and over the tip of the right hand (RH) knitting needle, pull the loop (lp) through the stitch (st). Slide the stitch (st) off the left hand (LH) knitting needle.
English: With yarn in back, insert the tip of the right hand (RH) knitting needle from front to back into the front leg of the next stitch (st) on the left hand (LH) knitting needle. Grab the yarn and bring it under and over the tip of the right hand (RH) knitting needle, pull the loop (lp) through the stitch (st). Slide the stitch (st) off the left hand (LH) knitting needle.
How to Purl: (abbreviated p)
The purl stitch is the second most basic and fundamental stitch after the knit stitch. Functionally, the purl stitch is simply a backwards knit stitch—the frontside of a purl stitch is identical to the backside of a knit stitch.
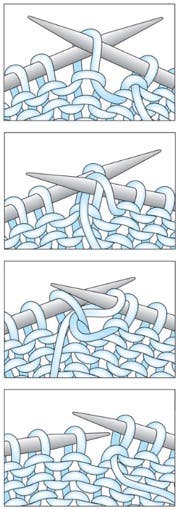
Continental (shown in video): With yarn in front, insert the tip of the right hand (RH) knitting needle from back to front through the front leg of the next stitch (st) on the left hand (LH) knitting needle. Wrap the yarn counterclockwise around the right hand (RH) knitting needle. With the right hand (RH) knitting needle, pull the loop (lp) through the stitch (st) and to the back. Slide the stitch (st) off left hand (LH) knitting needle.
English: With yarn in front, insert the tip of the right hand (RH) knitting needle from back to front through the front leg of the next stitch (st) on the left hand (LH) knitting needle. Bring the yarn from the front up and over the right hand (RH) needle tip and back down to the front (thus wrapping the yarn counterclockwise). With the right hand (RH) knitting needle, pull the loop (lp) through the stitch (st). Slide the stitch (st) off the left hand (LH) needle.
Fabrics Produced With Knit & Purl Stitches
Garter Stitch: When you knit every stitch of every row, you get garter stitch. You can also get garter stitch by purling every stitch of every row. Garter stitch is characterized by having a bumpy look on both the right and wrong side of the fabric. It is reversible.
When you learn to work in the round, you will produce garter stitch fabric by knitting all the stitches of one round and purling all the stitches of the next round.
Stockinette Stitch (or stocking stitch): When you work knit stitches on the right side and purl stitches on the wrong side of the fabric, you get stockinette fabric. This fabric is smooth on the right side and bumpy on the wrong side. What you see in the how to videos above is a swatch (small sample of knitting) worked in stockinette stitch.
When you learn to work in the round, you will produce stockinette stitch fabric by knitting all the stitches of every round.
Reverse Stockinette Stitch (or reverse stocking stitch): This happens when you work the purl stitches on the right side of the fabric and the knit stitches on the wrong side of the fabric. In other words you are just putting the wrong side (bumpy side) of a stockinette piece of fabric to the public side.
When you learn to work in the round, you will produce reverse stockinette stitch fabric by purling all the stitches of every round.
Combination Fabrics
You can combine these two basic stitches into a vast array of fabrics. You can create different ribs, seed and moss stitches and other textured stitch patterns. You can have a lot of fun experimenting with creating patterns alternating these two stitches in different ways.