How to Increase
Increasing stitches allows knitters to add shape or decorative touches to their projects depending on how the increases are used and if they are used in conjunction with decreases. Adding stitches can widen knit fabric to a specific size. When increases are used with decreases, they can also create decorative stitching like lacework and eyelets. Being able to make increases is necessary for most garment-making.
There are many ways to create increases. Which you use depends on the look that you are going for, if you’re working the increase as a knit or purl stitch, and if you want the increase to slant a certain direction. Increases can create holes or eyelets, or they can have a seamless look. They can also slant to the left or right to blend in with the knitted fabric or to lend a decorative touch.
You may work more than one increase into a stitch depending on the desired appearance. For example, you may be asked to work a “(k1, p1, k1) in next stitch” or a double yarn over (2yo). Both of these would have you creating two additional stitches. Bobbles also create several stitches in one stitch that are then decreased away to form the shape needed. So, don’t think all increasing happens one stitch at a time. It all depends on the desired effect or design element.
Generally speaking, a knitting pattern will specify which type of increase to use. If it doesn’t, then you are free to use your preferred increase or the one you feel will look the best in the knitted fabric. A few common increases are explained below. Try experimenting with different techniques in a practice swatch to see how different methods look and feel.
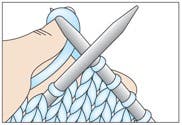
Backward Loop
There are two increases that do not require working into a previous stitch, and they are two of the easiest increases to create. These are the backward loop and yarn overs. The backward loop method is also a cast-on method. It does not create much of a slant, though the stitch may be a bit tight on the next row. It will also create a small hole in your work. Since it’s a cast-on method, it’s good for increasing stitches at the start or end of a row or round as well.
With your thumb, simply twist the yarn counterclockwise, place it onto the right-hand needle and pull to tighten.
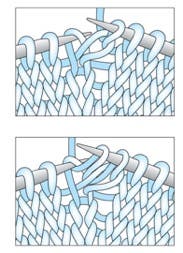
Yarn Over (abbreviated yo)
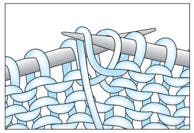
This is the second type of increase that doesn’t require working into a previous stitch to create. You are making a new stitch between stitches by strategically moving the yarn over the hook. You will create the yarn over differently depending on whether the next stitch is a knit stitch or a purl stitch. This type of increase does create a hole. It is often used in lacework and paired with a decrease to create pretty eyelets. If you want to minimize the hole, work through the back loop of the yarn over when you come to it on the next row.
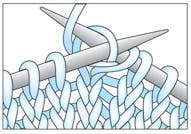
Working the yarn over when the next stitch after the yarn over is a knit stitch:
Bring the yarn to the front between the knitting needles and then take it back over the top of the right-hand knitting needle, thus adding a loop to the right-hand needle. Knit the next stitch.
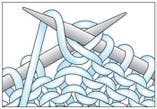
Working the yarn over when the next stitch after the yarn over is a purl stitch:
Bring the yarn to the front between the knitting needles, take it back over the top of the right-hand needle and then bring it back down and between the knitting needles to the front of the work. Purl the next stitch.
Double Yarn Over (abbreviated 2yo)
A double yarn over is used to create a large eyelet or hole in the work. It can also be worked to create elongated stitches. It is created by working two yarn overs one after the other. In other words, you wrap the yarn twice around the needle.
The double yarn over increases the stitch count by two stitches if both loops are worked into on the next row. Normally you work the first yarn over as a regular knit or purl stitch and the second yarn over through the back loop. This completes the increase and creates a rather large hole.
If using to create an elongated stitch, you work into the first yarn over and then drop the second one off the right-hand needle. This creates an extra-tall, or elongated, stitch.
Bar Increases
There are several types of bar increases. They are called this because a “bar,” or purl-like bump, is formed below one of the two stitches involved in the increase. The following increases are bar increases.
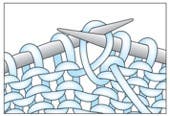
Knit Front & Back (abbreviated kfb)
This increase is a bar increase. It produces a tiny hole below it that may or may not be noticeable. For these two reasons, this type of increase is quite noticeable on your work, but it will blend in well if you’re working a textured stitch pattern. It is also a good option if you want an easy increase that is very close to the edge of your work, especially if that edge will be seamed.
A knit front and back increases the stitch count by one stitch. You can work versions of this that create two or more stitches at a time. For example, knit front, back and front (abbreviated kfbf) creates two new stitches. These types are generally used when wanting to create a specific decorative look.
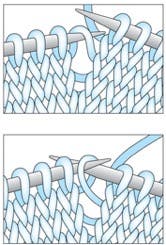
Knit into the next stitch but do not let the stitch on the left-hand needle come off of the needle. At this point you have one new stitch on your right-hand needle. Now insert the right-hand needle behind the left-hand needle and into the back leg of the same stitch and knit the stitch. You now have two stitches on the right-hand needle and you can allow the stitch to slide off of your left-hand needle.
There is a way to minimize the bar, or bump, that appears when you work this stitch.
Knit into the next stitch but do not let the stitch on the left-hand needle come off of the needle. At this point you have one new stitch on your right-hand needle. Next slip the stitch on the left-hand needle to the right-hand needle without working into it.
This minimizes the appearance of the bar since you aren’t working into the stitch.
Purl Front & Back (abbreviated pfb)
Another bar increase is the purl front and back. This increase is usually used when purl stitches are the predominant stitch of the row. Like the knit front and back, it increases the stitch count by one but can also have variations that create two or more stitches at a time. The bar created in this style of increase is also less noticeable since the bar resembles a purl stitch.
Purl into the next stitch but do not let the stitch on the left-hand needle come off of the needle. At this point you have one new stitch on your right-hand needle. Now insert the right-hand needle behind the left-hand needle and behind the back leg of the same stitch and purl the stitch. You now have two stitches on the right-hand needle and you can allow the stitch to slide off of your left-hand needle.
Running Thread Increases
The next several increases are running thread increases. This means the new stitch is created using the running thread, the strand that passes horizontally between two stitches. These types of increases have very minimal holes and slant in specific directions. They are used to create a more polished increase or a decorative line of increases. They are used to shape toes, necklines, armholes and more in garments and accessories. They are also used in lacework and stitch patterns to create slanting lines of stitches.
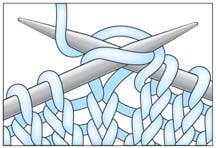
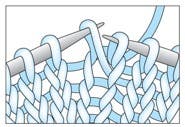
Make 1 Left (abbreviated M1L)
This increase uses the running thread between stitches and creates a new stitch that slants to the left. It creates one new stitch. There is a very minimal hole, if any, when this stitch is worked correctly.
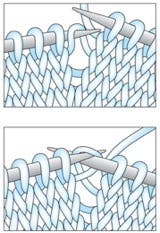
Insert the left-hand knitting needle from front to back under the horizontal strand that runs between the stitch on the right-hand knitting needle and the stitch on the left-hand knitting needle. With the right-hand knitting needle, knit into the back of the loop of the strand on the left-hand knitting needle.
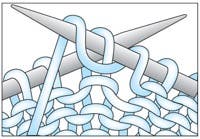
Make 1 Right (abbreviated M1R)
This increase uses the running thread between stitches and creates a new stitch that slants to the right. It creates one new stitch. Like with the Make 1 Left, there is a very minimal hole, if any, when this stitch is worked correctly.
Insert the left-hand knitting needle from back to front under the horizontal strand that runs between the stitch on the right-hand knitting needle and the stitch on the left-hand knitting needle. With the right-hand knitting needle, knit into the front of the loop of the strand on the left-hand knitting needle.
Make 1 Purl or Make 1 Right Purl (abbreviated M1P or M1RP)
This increase uses the running thread between stitches and is used when the fabric is predominantly purl stitches. If it’s not important which way the new stitch will slant, you will see this simply listed as M1P. This is sometimes called a M1PR because it will lean to the right on the knit side of the fabric but will just look like a bump on the purl side. This increase creates one new stitch.
Insert the left-hand knitting needle from back to front under the horizontal strand that runs between the stitch on the right-hand knitting needle and the stitch on the left-hand knitting needle. With the right-hand knitting needle, purl into the front of the loop of the strand on the left-hand knitting needle.
Make 1 Left Purl (abbreviated M1LP)
This increase uses the running thread between stitches and is used when the fabric is predominantly purl stitches. This stitch will lean to the left on the knit side of the fabric but will just look like a bump on the purl side. This increase creates one new stitch.
Insert the left-hand knitting needle from front to back under the horizontal strand that runs between the stitch on the right-hand knitting needle and the stitch on the left-hand knitting needle. With the right-hand knitting needle, purl into the back of the loop of the strand on the left-hand knitting needle by going behind the needle and the loop.
Lifted Increases
There are several types of lifted increases. These types of increases are also sometimes referred to as raised or invisible increases. For these increases, you are lifting up one side of a stitch from the row below and working into it to create a new stitch. These increases create an opening and tend to thicken the fabric below the new stitch. They are commonly used in textured stitch patterns. They can slant either to the left or right and can be worked in purl form on a predominantly purl fabric. Try to work them a bit loosely to minimize the hole made when creating them.
Left Lifted Increase (abbreviated LLI)
This lifted increase will create a stitch that slants to the left.
Insert the tip of the left-hand knitting needle into the stitch two rows below the stitch on the right-hand knitting needle, lift up the left leg of the stitch and knit it through the back loop.
Right Lifted Increase (abbreviated RLI)
This lifted increase will create a stitch that slants to the right.
Insert the tip of the right-hand knitting needle into the stitch below the next stitch on the left-hand knitting needle, lift up the right leg of the stitch onto the left-hand needle and knit the stitch. Then knit the next stitch on the left-hand knitting needle.