How to Finish & Seam
The final steps of knitting projects with several pieces can include weaving, grafting or sewing (seaming) in some way. You may need to sew the seams on a sweater or graft the end of the toe on a sock closed.
Seaming can seem a bit daunting if you do not want or are not fond of sew. When making pieces that are to be sewn together, leave yarn ends long enough to sew the sections together. This cuts down on the number of yarn ends to be woven in, making the work neater on the back.
When seaming pieces together, you may find it helpful to hold the pieces in place with stitch markers or straight pins. If you don’t have these items, many other things can assist in the process, such as toothpicks, hair clips, quilt clips or bobby pins.
Before seaming, block your pieces. This will make straight, crisp edges on your work and seaming will go much faster.
The techniques below will help you create a beautiful finish to your project.
Weaving in Ends
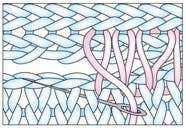
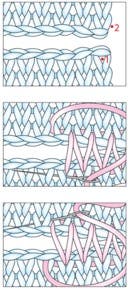
Every piece of knitting will have a starting yarn tail and an ending yarn tail that will need secured into the back, or wrong side, of the fabric. This is done by weaving in the ends through the back side of the stitches. There are several ways you can weave the yarn tails in. You can use a duplicate stitch (which mimics the knit stitches, or weave in a diagonal or in a large V-stitch shape. You should always weave in one direction and then back in the opposite direction nearby to make the ends extra-secure.
A common question is whether you should weave in yarn ends before or after blocking. There’s not a right or wrong answer. If you cut your yarn tails extra-long for seaming, you will want to weave them in after blocking, mostly because your seaming will be easier if you block the pieces first. One school of thought on the benefits of weaving in ends before blocking is that the blocking process lightly works the yarn so the little fibers of the yarn end are more firmly attached to the fabric it was woven through, thus holding it in place better.
If at some point in wearing or using your finished piece your yarn end pops out on the right side of the work, do not cut it. Cutting your yarn end every time it pops out might gradually shorten it to nothing and then you won’t have that yarn tail to hold your stitches in place. Instead, push the yarn end through to the wrong side and try to weave it under the back of the stitches again.
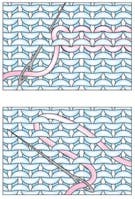
Thread a tapestry needle with the yarn tail and run the yarn tail through the back loops of the stitches, working diagonally along the piece. Weave at least 2 inches in one direction and then another 2 inches in the other direction. Gently pull the fabric a bit to even the stitches out, and then cut off the end of the yarn tail.
Kitchener Stitch
Kitchener stitch is used to graft live stitches (current stitches, not bound off stitches) together invisibly, or without a seam. You will use a tapestry needle to sew the live stitches together, mimicking the way they might have been knit together. This technique is most commonly used to close the toe of a sock, but it can also be used on garments and other pieces where you might want a smooth seam, like an underarm.
The tough part with Kitchener stitch is paying attention to what step in the process you are working. Say the stitching steps like a mantra as you work to help keep things straight. To work Kitchener stitch, you will have the stitches on two needles, one in the front and one in the back. Make sure you have the same number of stitches on both needles before beginning.
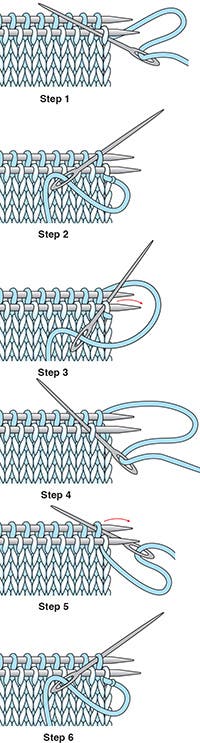
Step 1: Insert the tapestry needle into the first stitch on the front knitting needle as if to purl. Draw the yarn through the stitch, leaving the stitch on the knitting needle.
Step 2: Insert the tapestry needle into the first stitch on the back needle as if to knit. Draw the yarn through the stitch, leaving the stitch on the knitting needle.
Step 3: Insert the tapestry needle into the first stitch on the front needle as if to knit. Draw the yarn through the stitch and slip the stitch off the knitting needle.
Step 4: Insert the tapestry needle into the next stitch on same (front) needle as if to purl. Draw the yarn through the stitch, leaving the stitch on the knitting needle.
Step 5: Insert the tapestry needle into the first stitch on the back needle as if to purl. Draw the yarn through the stitch and slip the stitch off the knitting needle.
Step 6: Insert the tapestry needle into the next stitch on same (back) needle as if to knit. Draw the yarn through the stitch, leaving the stitch on the knitting needle.
Repeat steps 3–6 until one stitch is left on each needle. To finish, insert the tapestry needle in the front stitch as if to knit, draw the yarn through the stitch and slip the stitch off the knitting needle; insert the tapestry needle in the back stitch as if to purl, draw the yarn through the stitch and slip the stitch off the knitting needle. Fasten off. Woven stitches should be the same size as adjacent knitted stitches.
Mattress Stitch
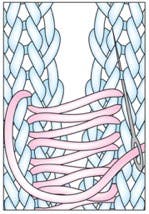
The mattress stitch is used to seam vertical pieces together along their selvage edges. It makes an invisible join when worked between stockinette stitch or ribbed pieces. It is often used to sew side seams or sleeve seams on sweaters.
Hold the two pieces parallel with the right sides of the fabric facing you and the cast-on edge at the bottom. Insert the tapestry needle from the back to the front between the first two stitches, just above the cast-on stitch; pull the yarn through, leaving a 3-inch tail. Insert the needle from the front to the back between the first stitch and second stitch of the second piece, and pull the yarn through.
Return to the first piece and insert the needle from the right side to the wrong side where the yarn previously came out of the piece. Slip the needle upward under the next horizontal bar and bring the needle through to the right side.
Cross to the other side and repeat the same process, going down where you came out, under one bar and up.
Continue until the seam is complete, pulling the seam closed every inch or so.
Weave in the tail. Use the beginning tail to even up the lower edge by working a figure 8 between the cast-on stitches at the corners. Insert the threaded tapestry needle from the front to the back under both threads of the corner cast-on stitch on the edge opposite the tail, then into the same stitch on the first edge. Pull gently until the “8” fills the gap.
Invisible Horizontal Seam
This seaming technique is used on stockinette stitch fabric to create a sturdy yet invisible seam. It is usually used where you sew a cast-on edge to a bound-off edge. It is often used on shoulder seams of a sweater. You will be sewing back and forth under the stitches to create what looks like duplicate stitching for a seamless look.
Hold the two pieces of fabric parallel to each other with right sides facing and cast-on edge at the bottom. Insert the tapestry needle from the back to the front between the first two stitches on the first piece of fabric just above the cast-on stitch. Pull the yarn through, leaving a 3-inch tail.
Insert the tapestry needle from the front to the back between the first two stitches of the second piece of fabric and pull the yarn through.
Return to the first piece of fabric and insert the tapestry needle from the right side to wrong side where the yarn comes out of the piece. Slip the tapestry needle upward under two horizontal stands and bring the needle through to the right side.
Cross to the other side and repeat the same process, going down where you came out, under two strands and up.
Continue working back and forth on the two pieces in the same manner for about an inch, and then gently pull on the yarn to snug the two pieces together. Continue until the seam is complete, pulling the seam closed every inch or so.
Weave in the tail. Use the beginning tail to even up the lower edge by working a figure 8 between the cast-on stitches at the corners. Insert the threaded needle from the front to the back under both threads of the corner cast-on stitch on the edge opposite the tail, then into the same stitch on the first edge. Pull gently until the “8” fills the gap.
Vertical to Horizontal Seam
This seaming technique is used when you need to join a vertical piece of knitting to a horizontal piece of knitting. This could happen where a collar is worked or where sleeve caps are sewn into armhole openings.
To sew a vertical edge to a horizontal edge, use a combination of the mattress stitch (vertical seaming method) and the invisible horizontal seam (horizontal seaming method). Work across one piece of fabric vertically, picking up the bars, and across the other piece horizontally, working under the point of the V’s.
Loosely pin the pieces together before you begin. Since there are more rows in each inch than stitches, you’ll need to accommodate for that difference so that the edge does not cause one side to pucker. When working stockinette stitch, for every third V point you pick up, pick up two bars rather than one.
For garter stitch, you will usually be seaming one horizontal ridge to one stitch. For other stitch patterns, pinning the two pieces together will give you a good sense of how you’ll need to seam the two pieces together.