How to Cast On
Before you can work stitches, you must get loops on your knitting needles. Casting on, sometimes abbreviated CO, is how knitters start every project. It is how all the loops are placed on the knitting needles to work the first row of stitching. To cast on stitches will be the first line of instructions in a knitting pattern.
There are many different types of cast-ons. They each have a different appearance and amount of elasticity. If a specific cast-on method is required, a designer will state that in the pattern. If no method is directly stated, you are free to cast on as you would like. Here we will introduce you to five of the most common types of cast-ons and their qualities. When choosing between them, pick the one that has the qualities you most want to see reflected in your knit piece.
People new to knitting tend to cast on quite tight. The easiest way to avoid a tight cast-on is to use a needle (or needles) one size larger than what you will be using for your project. Then for the first row of instructions, switch to the project needles.
Before beginning, you need to get your starting loop on your needle. There are a couple of ways to do this. You can use a slip knot or a twist start. If you would like to avoid the hard bump a slip knot causes, try the twist start.
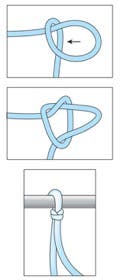
How to Make a Slip Knot
The slip knot can slide up and down to fit the size of your needle. Tying a slip knot creates the first stitch and is used to cast on the rest of the stitches. If you make it the wrong size or want to start over, you can take it off the needle and undo it by pulling on the yarn end.
Before making your slip knot, make sure that you are leaving enough yarn on the other side of your knot (also known as a tail). The length of yarn needed for your tail will depend on which cast-on method you're using as well as how you plan to finish the project.
Make an overhand knot. Pull the strand through the loop. Tighten the knot on the needle as needed.
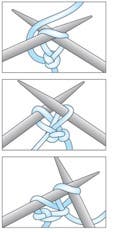
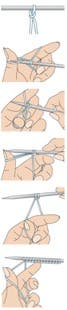
How to Make a Twist Start
The twist start is a super simple way to get the first loop on your hook and will leave the starting corner of your knitting smooth.
Leave a long enough tail to work your preferred cast-on method. Hold the yarn tail with your left hand so that the strand is taut from the yarn ball. With your right hand, lay the knitting needle on top of the yarn, move the needle downward and back up under the strand, twisting it onto the needle. The yarn will circle around the needle with the two strands (tail and working yarn ends) crossed below it. When you move the needle into your left hand to work your preferred cast-on, it will remain twisted around the needle as your first loop.
Alternatively, while holding the yarn taut with your left hand, grab the yarn between two fingers of your right hand and twist clockwise to create a loop, then slide your knitting needle into that loop. The yarn tail and working end of the yarn will be twisted at the base, and you will be ready to work your preferred cast-on method. Hold the bottom of the loop until you have created your first stitch using the cast-on method of your choice.
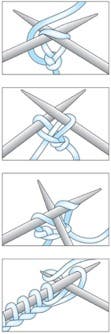
Knitted Cast-On
This method is great for beginners because the technique is almost the same as the basic knit stitch. The edges of this cast-on tend to be very loopy and flair out a bit. As long as it isn’t worked too tightly, it is a fairly resilient cast-on edge. This is a good all-purpose edge.
Make a slip knot or twist start on the left-hand knitting needle.
Knit a stitch, being careful to leave the first loop on the left-hand needle. Transfer the new stitch to the left-hand needle, being careful not to twist or turn the stitch in the transfer. Reinsert the right-hand needle into the new stitch and with both tips in the loop, pull the yarn to tighten the stitch.
Repeat this process until you have cast on the number of stitches indicated in the pattern.
Cable Cast-On
The name "cable cast-on" can sound a bit misleading because it isn't like cable knitting. The method gets its name from the edge pattern it makes, which looks like a rope or twisted cable. The cable cast-on is dense and not very elastic, which makes it great for scarves, dishcloths and anything on which you want the cast-on edge held firmly in place.
Make a slip knot or twist start on the left-hand knitting needle.
Knit a stitch as you would for the knitted cast-on, transferring it to the left-hand knitting needle so that you have two stitches on that needle.
For all remaining stitches, insert the right-hand knitting needle between the first two stitches on the left-hand knitting needle. Wrap yarn as to knit, draw the new stitch through and transfer it directly to the left-hand needle.
Repeat until you have cast on the number of stitches indicated in the pattern.
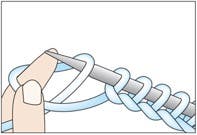
Long-Tail Cast-On
The long-tail cast-on is a compound cast-on. You are not only putting loops on the needle, but you are also working the first row of stitches. You can work a long-tail cast-on with the appearance of knit, purl or a combination of both stitches. In this explanation, we show the knit version. This produces a fairly elastic edge that can blend well with the fabric you are working. It is superfast to work and is suitable for almost anything you might knit. It is perfect for ribbed edges or pieces you want to have a stretchy fit like hats, mittens and necklines.
In this method, you hold the knitting needle in your right hand and two strands of yarn in your left hand (one strand will be used for the edge and the other for the stitches). For ease, you will want to use a slip knot (not a twist start) as your first loop. You will also need to measure out a length of yarn for the edge strand. This length of yarn should be about three times the finished width of your project plus 6 inches. So, if your project is 10 inches wide, you need a length that is at least 36 inches long to begin the cast on. That measurement is where you will make your slip knot.
With the slip knot on the needle, the yarn tail closest to you and the needle in your right hand, hold the knot in place with your right index finger and grab the strands of yarn in the palm of your left hand. Insert your left thumb and index finger between the strands, spread them apart slightly and then move the left hand and needle apart to place some tension on the strands between needle and fingers. Hold your left hand with your thumb and index finger pointing up and palm facing the tip of the needle, keeping them about 2 to 3 inches apart. They should create a V shape.
Place the knitting needle in front of the strand around your thumb and bring it underneath this strand. Carry the knitting needle over and under the strand on your index finger. Draw through the loop on your thumb. Drop the loop from your thumb and draw up the strand to form a stitch on the knitting needle.
Repeat until you have cast on the number of stitches indicated in the pattern.
Backward Loop Cast-On
The backward loop is a finger cast-on, meaning you rely on the use of fingers to manipulate the yarn to place the stitches on the needle. This cast-on utilizes a crossed loop, sometimes referred to as an e-loop because it closely resembles the look of a cursive e as you work it. This is a fast cast-on to work, but sometimes the loops are hard to work into and can make an uneven edge. It works great for adding stitches at underarms on sweaters or for adding stitches to the start or end of a row.
Pick up the working yarn with your left hand and create a loop. Twist the loop a half-turn to the right. Put the loop on the knitting needle and pull the working yarn to tighten.
Repeat until you have cast on the number of stitches indicated in the pattern.
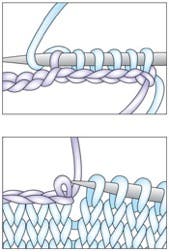
Provisional Cast-On
There are times when you need a cast-on that can be removed easily to free up stitches. One instance might be if you want to make your cast-on edge the same as your bind-off edge. You can free the stitches, place them back on the needle and work the bind off on the edge to keep things matching. It’s also handy for when you want to go back and add a decorative edge or graft two sides of your knitting together (like in the toe of a sock or when working two halves of a project in the same manner).
There are many ways to work a provisional cast-on. What is explained below is just one option. Some methods do not require a crochet hook. For all methods, you will want to use a scrap of yarn in a contrasting color. It also helps if this yarn is smooth and slippery so that when you “unzip” (or undo) it later on, the yarn slides away easily from your stitches. Be careful when working into your provisional cast-on that you do not split or knit into the yarn strand of the cast-on. This can cause problems when you go to unzip it later on. When unzipping the stitches, you will pick up the loops of the knitting and place them back onto your knitting needle. It is sometimes helpful to use a smaller needle to do this and then transfer the stitches to the correct knitting needle. Also make sure that you are placing the stitches back onto your needle with the correct orientation.
Using waste yarn and a crochet hook the same size as the project knitting needle, make a chain that has a few more stitches than the number of stitches to be cast on. Cut the waste yarn and knot the cut end. Using a knitting needle, pick up and knit a stitch in the back bump of each chain stitch until the required number of stitches is on the knitting needle.
When the pattern indicates to do so, remove the waste yarn. Starting at the knotted end of the crochet chain, undo (unzip) a loop of the crochet chain and insert the knitting needle into the stitch that has been freed (this stitch is from the original first row of knitting). Continue to undo the crochet chain until all the stitches are on the needle.