Attached I-Cord or Applied I-Cord
Attached, or applied, I-cords are a way to put a nice finished edge on your knitting. They can flatten an edge that wants to curl. They hold up well because of their sturdiness.
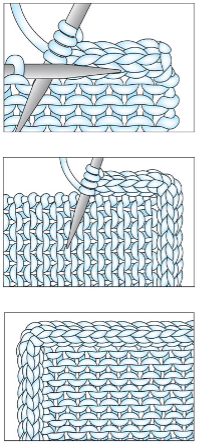
Attached I-cords are created by casting on a small number of stitches. You then work across them and knit the last stitch of the I-cord to the first stitch of the knit fabric (sometimes the stitches on the knit fabric are kept live to make joining easier). You can knit them together using any of the decrease methods that create the look you desire. You then move the stitches back to the left-hand needle to work them again. The cording is always worked with the right side facing. By moving back to the left-hand needle and working from the start again, you are essentially creating a tube along the edge of the work.
If the attached I-cord is worked around the entire piece, you will generally sew the start of it to the end. Or you can think ahead and work a provisional cast-on for the starting stitches, then graft the two ends together when they meet back up.
There is more than one way to work an attached I-cord. Follow the specific instructions in your pattern to create the I-cord in the manner the designer intended. Below is one way of working the attached I-cord.
At the end of the row, cast on four stitches to the left-hand knitting needle. Knit the first three I-cord stitches, and then work a knit 2 together decrease, joining the last I-cord stitch with the first stitch of the main fabric. Repeat until all the stitches across the main fabric have been bound off.
To turn a corner, work three rows of unattached I-cord.
To attach the I-cord along the vertical edge, knit three, slip one knitwise, knit one stitch from the main fabric edge, and pass the slipped stitch over. Repeat.